

(Grab an old sponge - yes, seriously)
I have a Canon Pixma MG5750, a Currys PC World purchase when I needed a cheap multifunction printer fast. Handy at £45 (another set of genuine ink for it costs the same, go figure). I never expected it to be perfect, I assumed it would at least be able to reliably accomplish basic things like print text onto paper.
Unfortunately, one of the fundamental printer requirements - loading its own paper during print jobs - was a little lacking with this unit. Research indicates it's sadly a common issue with this range of Canon printers.
Soon after buying mine, the paper feed (take-up of paper from the tray into the transport mechanism) started to behave irregularly. Soon after that, I ended up having to nudge each sheet of paper in to the printer, it was unable to take in paper itself. Not convenient.
I put up with this for a while but an attempt to print some documents evening pushed me into investigating. The fix, as it turns out, is really simple!
The Canon MG5750 (and printers of its ilk) are designed to a price, and that is cheap. All components are nylon and plastic where possible, plastic is flimsy and important components like springs are small and presumably old stock - and this was ultimately the root cause of my problem.
- The symptom: the printer would be unable to take paper in, meaning it would sit and spin its internal rollers helplessly several times before complaining there was no paper loaded.
- The cause: a tiny spring, intended to load the paper intake rollers, is inadequately weak. The intake / feed-in rollers just slide around on top of the paper instead of gripping it and pulling it into the print mechanism.
- The solution: a bit of sponge (seriously).
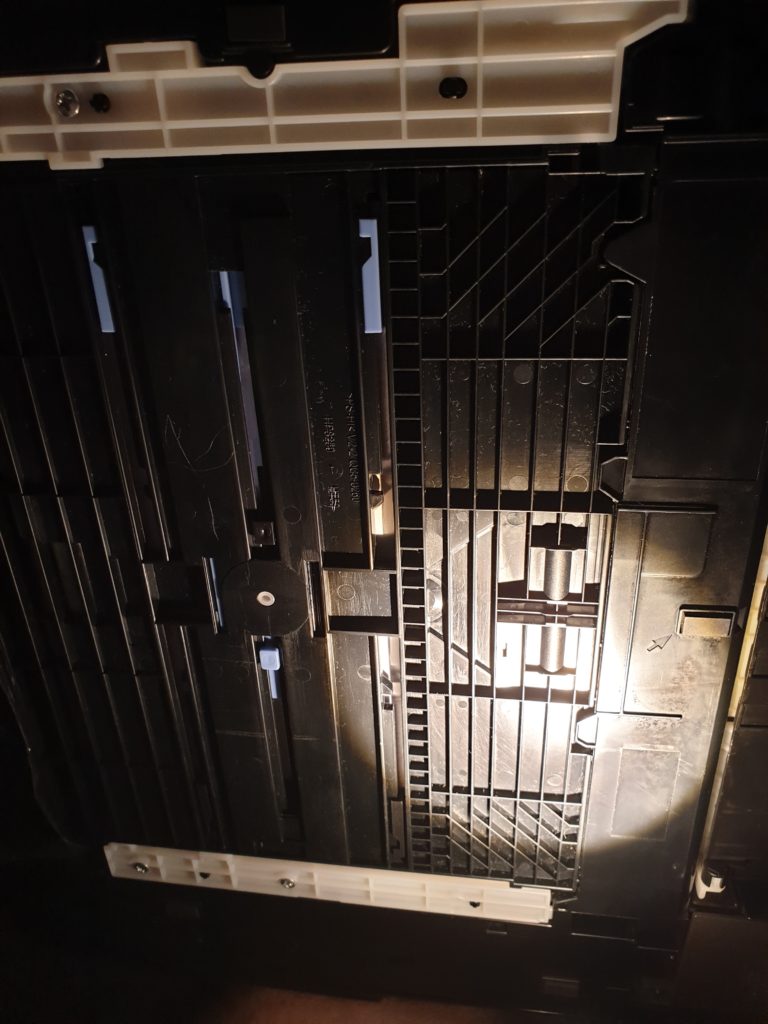
This is the underside of the printer. The paper tray forms the base of the printer when it's slid into place, the grey strips are its guide runners. (view larger)
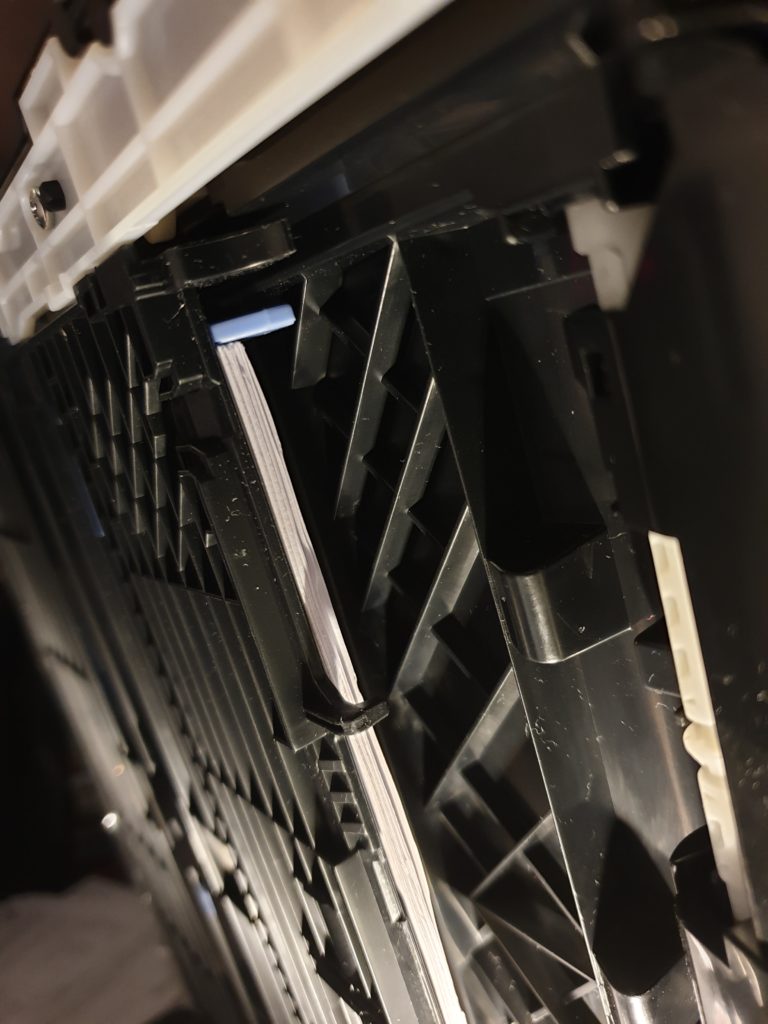
This is the underside of the printer on its side with the paper tray partway open.
What should happen: When you slide the paper tray closed, the black tab at the top of the image (just above the bit of blue plastic you can see against the paper) contacts a protruding black plastic 'leg', which pushes the infeed roller arm up and over the paper as it's inserted. (view larger)
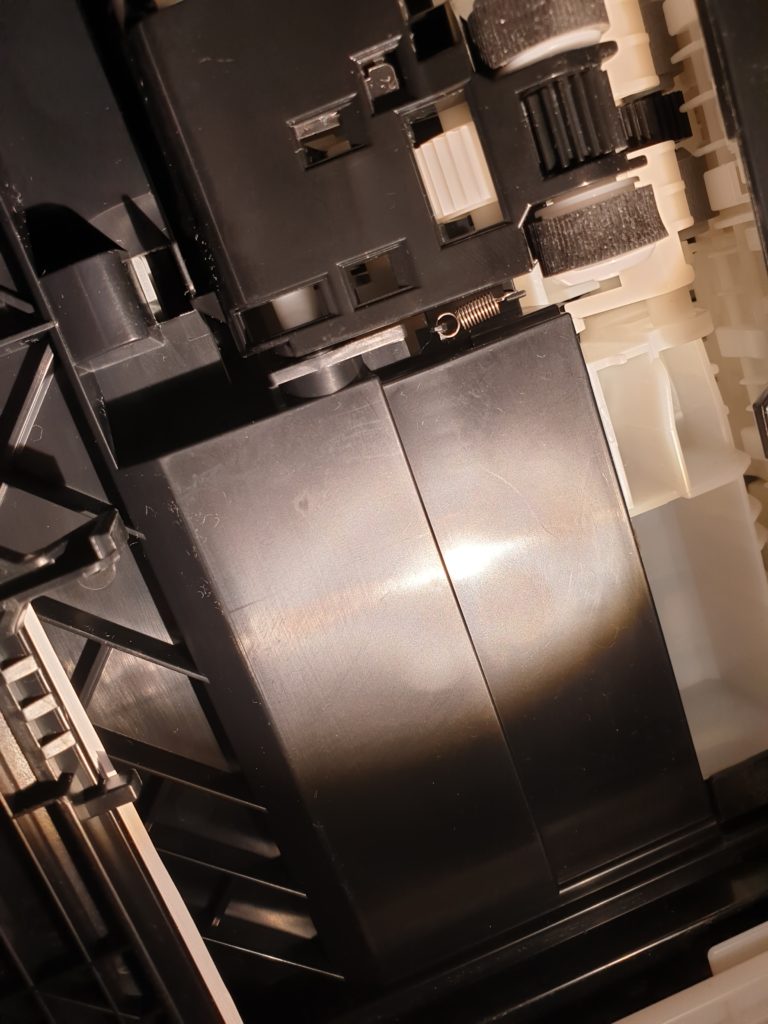
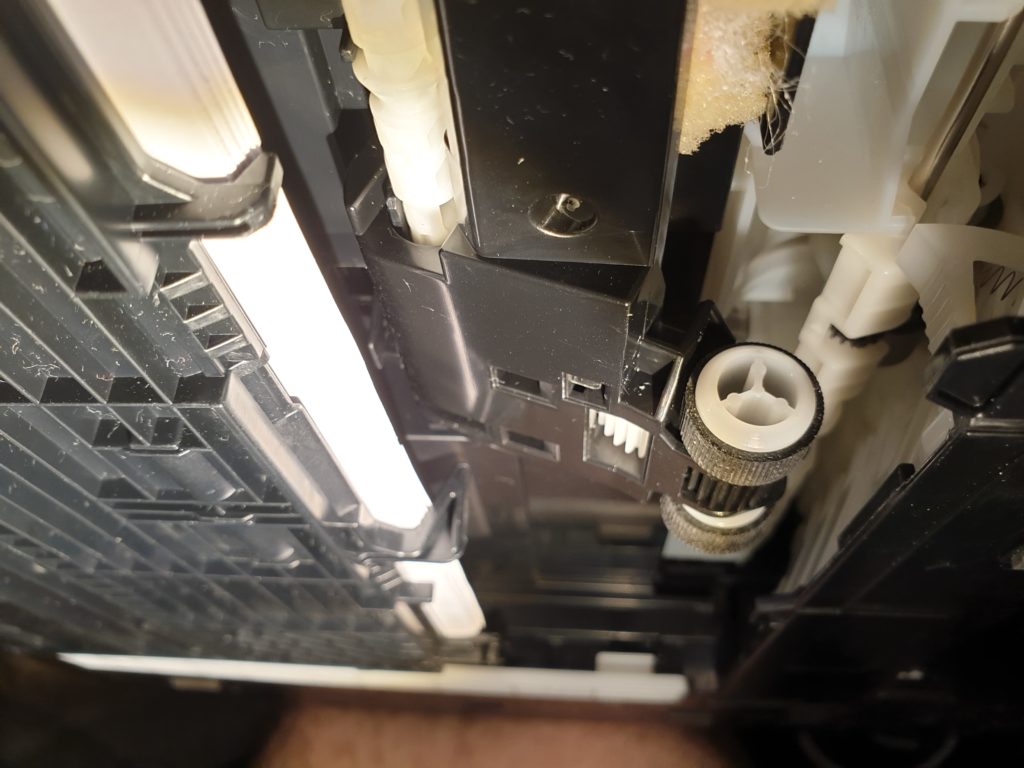
This would be fine, if the retaining spring's opposing force was strong enough. It's a miserably tiny thing. See it near the middle of the photo, just next to one of the two black rubber paper intake rollers? (view larger)
I tried all sorts - wrapping the rollers with small strips of tacky gaffer tape to widen their diameter; pushing up on the underside of the paper tray to try and make them contact the rollers better; I even moved the rubber tracks towards the edge of the wheels to make their edges 'ride up' and contact the paper better. Nothing worked well.
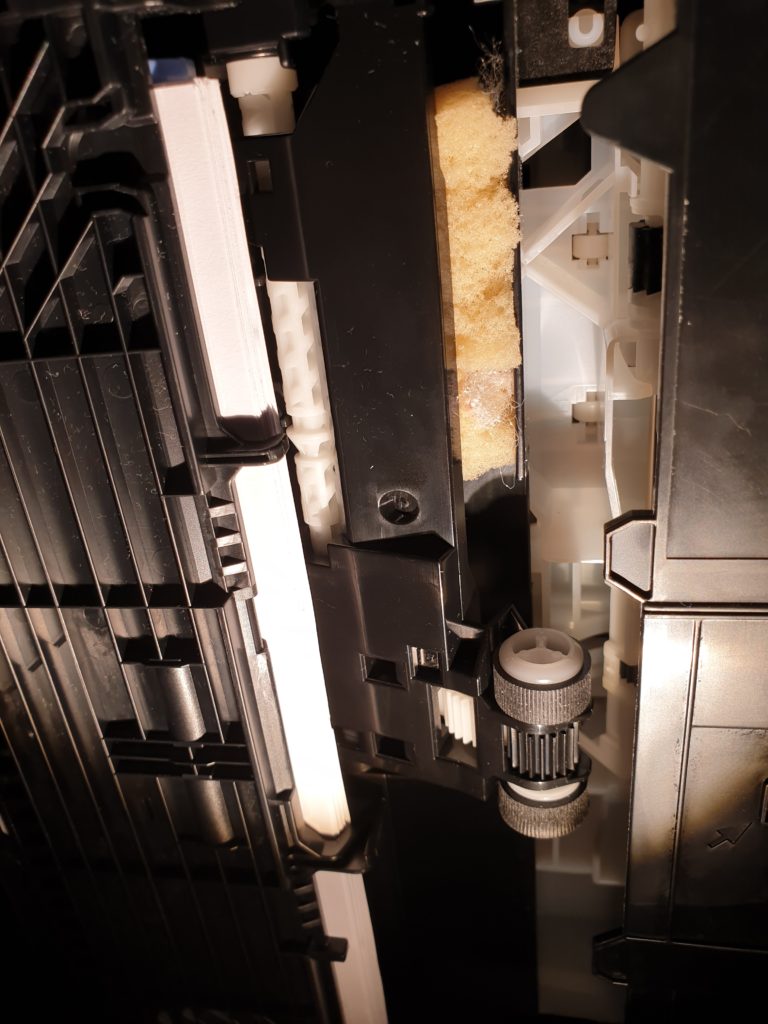
In the end, some sponge (visible behind the bar supporting the feed rollers) solved the problem! (view larger)
Before I used the sponge method, moving the grippy rubber bands to the edge of the grooves on the rollers worked, proving it was a simple issue of roller clearance, but it's not ideal. You end up stretching the rubber tracks around the feed rollers, wearing them smooth prematurely and ending up with catastrophic loss of grip, just like excessive camber on F1 cars (ha).
There's nothing really you can adjust with these printers; the tension spring was just not good enough to adequately pull the rollers down into contact with the paper. So I went to the Internet for inspiration because I knew I wanted to somehow either add weight to the horizontal bar on which the rollers were mounted, or increase the spring tension.
I wanted to avoid removing the tiny tension spring, because they frequently fly off into another dimension, and fortunately I stumbled upon a post by David Camm on a TechAdvisor forum thread:
Hi Folks, this is an asy fix, get a sponge, I used the sponge off a dish scourer, you only need half of that, cut it off the scourer part.
Now find the paper feeder roller that takes the paper from the tray. (its under the printer behind a panel that has the paper in. You will notice the feeder roller attached to a plastic panel that moves up and down to grip the paper, this roller has a small spring on the side. I noticed there is hardly any force pressing the roller to the paper, hence the problem.
Put the sponge behind the piece of plastic away from the rollers taking care not to put it behind the actual rollers. This increases pressure on the roller so it takes the paper every time. just done 150 double sided sheets with no problems. Make sure the plastic holding the roller still moves up and down freely, the sponge should not be so tight as it prevents free movement.My MG550 had this issue from new as well but this spong has fixed it. Its very simple to do.
DavidCamm on TechAdvisor
I realised that, as long as you fitted correctly-sized pieces of sponge snugly, and underneath the part of the bar closest to the tray slide rail (and without it catching in the rotating arm which drives the rollers), this is a beautifully neat solution which solves the problem.
An old Dishmatic head was just the right dimensions and with enough pushback thanks to its top layer to give the rollers adequate friction. Any medium density foam or sponge should work fine.
So thanks, David Camm, wherever you may be! You solved my frustrations and prevented me taking apart my printer in desperation to try and fix. Sometimes the stupidly simple solutions are the best!
I recently found that 'Beach Badger' tried the sponge fix with success - check his video on YouTube demonstrating how quick the fix is, or see below:
'Helen Spuddulike' also made a video demonstrating another method for cleaning some of the other internal rollers, involving some adhesive tape on a longer piece of cardboard. Her method has the advantage of allowing feed rollers to rotate and effectively self-clean while avoiding disassembly, which could be useful if you're getting dirty marks or ink stains on your paper:
'IONHowTo' also has a useful video compiling a few things to check and maintain on printers -- and what not to try (his demo printer is a Canon, but may be useful for owners of other brands):
These easy but non-obvious foxes do make me wonder how many people have thrown away an otherwise functional printer, just because the roller and tension spring design isn't fit for purpose. I'm really glad that so many people have had success and got their printers back in service, and I really appreciate people commenting and emailing me to let me know 🙂 On behalf of our planet, thank you for not throwing your printer in the trash!
Best thing about this fix is that it's trivial to reach the area once the paper 'cassette' is slid out, and it's easily reversible should you decide you don't want sponge there any more. Prop the printer on your knee on its side and just add the sponge pieces as needed. I went for two rectangular pieces. Secure the sponge with gaffer tape if you're feeling nervous, but it should be fine there forever.
Happy printing!
Thank you a thousand times. The sponge trick worked for me. Cleaned the rollers and that worked for about eight papers then, in desperation, tried the sponge trick. B*** marvelous. Have printed 100 pages without a problem. Thanks again.
Another printer saved from landfill, which is always good news. Now all we have to do is find reliable ink which doesn't cost a month's wages... Thanks for the comment 🙂
I've got a CISS (Continuous Ink Supply System) on mine. Far cheaper to run.
https://www.cityinkexpress.co.uk/ciss
Nice, I was weighing up a printer with a CISS last time but realised my print volume is nowhere near adequate for an external CISS, and knowing my luck mine would leak everywhere... Canon OEM cartridges for the time being! What printer have you paired your CISS with?
Who are you and How do I find you? I just located you online while searching how to fix my printer; but, I have given up and found one that is similar at WalMart. I am 75 years young and not quite as agile as I used to be nor patient.
So I wanted to drop you a line and let you know I appreciate your hard work and would like to know how to access you in the future, if possible.
Thank you,
Becky
Hi! I'm Chris and I live in the UK. Message received - appreciate you dropping me a line and if you want to get in touch in future, you can get my email address from the Contact page. I've also dropped you an email to the address you supplied on your comment. Cheers! https://chriswoods.co.uk/contact/
I really wish I'd found this years ago.. we've printed Masters Theses, GCSE projects, legal letters etc one bleeping page at a time for about 6 years now XD. Unfortunately the reason that brought me to your page was another common PIXMA fault which I think is terminal this time. The print head under the largest reservoir (PGBK) is so far out of alignment that none of the vertical tests on the alignment test get rid of the lines - and they are also keystoned (for those of you who have struggled with old CRT's or projectors you may know what I mean) so that the bottom of the test strip may align but the top is about 2-3mm out! I've tried a manual realignment but it's so bad nothing works any longer - tried a manual clean of the head, a number of catridge reseats, different cartridges, OEM, aftermarket etc. No joy 🙁 I think this Printer is for the recycling pile.
Oh dear, that sounds a little more terminal - if you are reconciled to WEEEing the printer in the worst case, I'd propose a careful disassembly to see if anything's stuck in the printhead mechanism, and scrap it if it's unfixable. Might yet be repairable? When I took apart my last (Epson) printer, it never quite reassembled properly afterwards 😉
Genius! Years of misery solved in under a minute.
Can't thank you enough.
Hive mind of the Internet comes together to cure a problem once again 🙂
This helped. Thanks
Thank you for this video. Life saver!
Thank you so much for this! <3 My old Canon Pixma MG5550 stopped eating paper just when I was supposed to print all my Christmas cards, super annoying timing, but I googled and found your blog and this crazy little sponge trick worked! Amazing, big thank you, I hope you have a great Holiday season! 🙂 Greets from Finland!
Likewise, very glad to have helped save your sanity just in time for Christmas. Greetings from the UK 🙂
Thanks so much!
This was driving me spare!
Really appreciate your taking the time to post this simple and easy (and so far 100% successful) fix!
Cheers
Rod
Hi Rod, It's still working for me a couple of years on so hopefully will work for you for a long time yet. Thanks for the message. Cheers, Chris
Awesome fix.
I'm a skilled guy, but my brain was trying to over-engineer a solution. Glad I did a quick search.
Agree with other posters, it's also important to recognise other people's efforts and more simplistic solutions, thank you! Also saved another printer, which doubtless has many more useful years ahead.
The dog bowl cleaning sponge is a bit smaller this morning.....
Hopefully the dog's OK with that 😉 thanks for commenting! Sorry I was delayed replying to you. Cheers!
Thanks so much for posting this solution. It worked for my MX492. I cleaned the rollers (both the feeder rollers and the transport rollers) too. Whew! Happy 2024!
Hurray! Happy days, thanks for letting me know it worked for you. Is the MX underside design similar to the MG series?
Hi - thanks for this ! I just fixed my MG5660 which is at least 5 years old with the sponge trick. Apart from the paper issue it is still going strong
Found this article and i was having to do exactly as you described by feeding in manually each individual page and this was after cleaning the roller. Tried the sponge method and it worked! Thanks for this and saved me from buying new printer for a while anyways!
More than four years after posting the tip, it still applies to my Pixima TR4550, which required me to feed it paper by paper. It was precisely the spring that did not push the rollers hard enough onto the paper to grip it. Thank you very much!
You just saved Satan, I mean my printer from a dumpster. Thank you so much. I tried everything. I have a slightly different model (MG3220) much harder to get to the spot but I figured it'd either this or I'm throwing it out anyway so I managed it. Just printed out a pattern. Thank you, thank you!!!!
The Printer Rises Again Thanks for the data point that it also worked on an MG3220, might be useful for another internet traveller 🙂 and thanks for commenting! Sorry I took so long to get back to you, my WordPress spam plugin got VERY enthusiastic and started filtering valid comments. Hopefully it's fixed now...
I had come to the same conclusion (after cleaning the rollers) that it had to be a tension problem...was kind of anxious about changing the little spring (they tend to break and go into the hardest to reach places). Most of the time these 'fixes' require too much time and create too many other problems that it's not worth it trying them out.
THIS however...worked flawlessly! I'd never considered propping up the tensioner like this, so it's a genius fix! And as you said...you can undo the 'mod' any time or replace it or modify it on the fly. Perfect!
I hate permanently modifying stuff if I can avoid it, it seemed like it might just be stupid enough to work. 😮 and behold it did work great, which made me happy. And is now making many other people happy too, which gives me a little bit of happiness every time someone comments. Cheers!
The Sponge fix is brilliant and so simple. You should patent the idea and sell it back to Canon!
I have a feeling someone in Canon HQ is using the same technique to keep their office printer going... Great isn't it! I can't claim to be the originator of the idea, but I'm glad that my stupid little blog post has been seen by (and helped) so many people. Cheers for commenting!
Brilliant!! I found this article after a quick google. Less than a minute to fix what had been a frustrating, pushing each sheet 1 at a time. Thank You so much for sharing this! This printer (MG5650) will not be going into an expensive repair shop or landfill.
Perhaps you could set up a repair business with patented TuffSponge™ technology? 😉 Nice to know it helped! Thanks for commenting 🙂
It works. so easy and after hours of frustration and cleaning. I could see this was the problem but not how to overcome the problem. a slice of sponge did the trick. Thank you
Slice of sponge for the printer, slice of sponge cake to celebrate for the human operator...? Thanks for leaving a comment 🙂 It's always great to know this post is helping people with the same issue.
Thank you! You are a genius. I am now able to print again.
I'm just persistent, and willing to try stupid-sounding things until I find something that works 😉 Glad it also worked for you, thanks for commenting!
tried it, it works!!
after years of fiddling around and searching the internet I finally stumbled on your page.
thank you so much for this tip.
Woohoo, that's great news. 🙂 Thanks for stopping by and saying hello, ik waardeer het. Cheers!
Just stumbled across this. I did as instructed and can concur this works beautifully. I have a Canon MG6460 that is a number of years old and I just pulled it out of storage as I had it repaired when it was near new due to a faulty scanner. In the meantime I bought two subsequent printers that have been thrown away for various faults and I thought I'd get this one back into commission. Amazingly it still printed without even having to perform a head clean but the paper didn't feed (that's a new one for me). I tried the on-board roller clean and cleaned the rollers with a baby wipe without much success. The sponge trick saved the day! I'm glad because I've been using Canon printers since 1997 and I'm so used to the IJ scan software I'd hate to try a new brand. All modern Canon printers seem to get a lot of negative reviews so using an older one suits me just fine. Thank you!
I share your pain - I'm loathe to ditch my Canon due to knowing precisely how to get it set up (and the network configuration is quite particular and 'just works' after loads of hassle). Perhaps a Brother or Lexmark would be better.... The Canon is small enough to perch on my tiny desk though. Nothing wrong with old printers sometimes! I pay the printer tax and give mine genuine ink (giving in to the $$$ for the superior formulation) and the heads just keep going and going, no blockages, image fade or print quality issues.
It freaking worked! And so trivial to do!
Isn't it nice when the quick fixes are the best ones 😉 Thanks for stopping by and saying hi!
Hi this looks like a great solution. But I have a pixma 4250 and it doesn’t have a paper tray that slides out. Do you have any idea how I can get in to the roller?
Hi Lydia, sorry for the delay replying - WordPress anti-spam plugin got a bit 'enthusiastic' and held a lot of valid comments for approval which I didn't see. Another commenter called Henk posted this recently:
This might be of some help for you? Let me know how you get on!
Problem solved!!
Cat pictures printed!!
I came across this post but don't have a Canon printer model with a paper tray, meaning I can't directly access the intake rollers from the bottom of the printer (Canon PIXMA MG3550).
I found there are two ways to still apply this fix;
1. Disassemble the whole printer top-down. Find a guide to assist you in this, as these printers are not easy to open up and the intake rollers are one of the last parts you can access.
I found a good guide in the iFixit website (https://www.ifixit.com/Guide/Canon+Pixma+MG3550+Disassembly/119426).
2. Try to access the rollers from the backside of the printer. In my case, I could removed the paper guide tray on the back of the printer and use a screwdriver with a flexible shaft to remove two screws for which you would normally have to take the printer apart.
Once you have access to the intake rollers assembly, you can apply the same sponge fix as mentioned in the article.
Hi Henk, thanks for the detailed notes - sorry for the delay replying. WordPress anti-spam plugin got a bit 'enthusiastic' and held a lot of valid comments for approval which I didn't see. That iFixit guide's really useful, and I appreciate you adding your experience, hopefully it helps other people with similar models. Cheers!
just resurrected my Dad's MG5750 - now works perfectly! Thank you
Hi printer buddy And great news, always good to help save the planet bit by bit. Thanks for commenting 🙂
My Canon MG5560 had given up feeding regardless of what I cleaned and was 1 day away from the garbage pickup tomorrow when I came upon this tip. Thank You so much, works as good as new - actually I think it's better. Well done!
Huzzah, great news! Another printer saved from e-waste! 🙂 Thanks for commenting and adding that datapoint about the 5560 sharing the same design.
This seems to have solved the problem of picking up the paper! Now to figure out why it's immediately crunching up the paper and jamming ^^;
I was just given this one for free, so it's a fun fixer-upper 🙂
Sorry for the delay replying - WordPress anti-spam plugin got a bit 'enthusiastic' and held a lot of valid comments for approval which I didn't see. I had an issue with the amount of paper in the feed tray, I found that actually removing some paper helped my MG pick it up better, once I'd given it more downward pressure with the sponge. Also certain laserjet paper seems thinner and not really suitable for this printer. What sort of gsm paper do you have?
Hi Chris,
Used your sponge method on my Canon TS5100 today and it’s working perfectly as the paper was not lifting despite the paper tray being full. As for the spring you mentioned in your article it’s useless and being so weak and flimsy does not serve any purpose at all.
Thank you for this great fix.
Glad to hear it worked, and sorry for the delay replying. Useful data point that it also works fine for the TS5100 model. Cheers!
Thank you so much. Our Canon MG5750 is now working perfectly again thanks to you.
Glad to hear it Robert. Hurray, another otherwise-fine printer saved from WEEE landfill 🙂
Hi Chris,
Your tutorial is one of the best I've seen & the TR4520, like so many others has been spared the "Final Ride" to the scrapper. It's been down so long I have to order new ink.
8-0
It's gratifying to know we're all helping prevent a bit of e-waste. And my printer is also still doing great!
Im having to feed and force paper of any kind with the bottom tray and its really pissing me off.brand new printer ts4300 series. I tried the sponge thing and it wasnt working out to well. But its obviously the whole paper feed parts. Its all cheap small plastic and not strong enough to put pressure on paper to feed it. Canon printers with bottom feed are all junk.only positive thing about canon printers is they dont block your printer and force new cartridegs unlike crappy epson. Epson was the worst printer to buy with them blocking your ink.
This solved my issue with photo paper not being picked up on my MG7550. Thank you so much!
Excellent! And thanks for letting me know it came in useful 🙂
After a thorough cleaning with compressed air (low pressure) and cleaning with alcohol, I added a sponge... and the printer started working again. My compliments.
Beautiful work 😀 DIY fixes are really satisfying when they work. What model do you have?
model MG 5750..
Nice, a fellow 5750 owner 🙂 hope it's still working for you since you did the mod.
THANK YOU! I found your link to this via the canon community & this hack fixed my printer! I used a little magic eraser sponge. Appreciate it!
Cool, very glad to hear it!
Wanted to thank you for the sponge hack to restore the paper feed and to let you know it also works on the HP Deskjet 2724 printer, this entire series of HP printers is plagued with this problem and none of the You-Tube fixes have worked.
Excellent, very happy to hear it's helped save another printer owner from frustration 🙂 Thanks for including the model info as well, hopefully it will help others!