

(Grab an old sponge - yes, seriously)
I have a Canon Pixma MG5750, a Currys PC World purchase when I needed a cheap multifunction printer fast. Handy at £45 (another set of genuine ink for it costs the same, go figure). I never expected it to be perfect, I assumed it would at least be able to reliably accomplish basic things like print text onto paper.
Unfortunately, one of the fundamental printer requirements - loading its own paper during print jobs - was a little lacking with this unit. Research indicates it's sadly a common issue with this range of Canon printers.
Soon after buying mine, the paper feed (take-up of paper from the tray into the transport mechanism) started to behave irregularly. Soon after that, I ended up having to nudge each sheet of paper in to the printer, it was unable to take in paper itself. Not convenient.
I put up with this for a while but an attempt to print some documents evening pushed me into investigating. The fix, as it turns out, is really simple!
The Canon MG5750 (and printers of its ilk) are designed to a price, and that is cheap. All components are nylon and plastic where possible, plastic is flimsy and important components like springs are small and presumably old stock - and this was ultimately the root cause of my problem.
- The symptom: the printer would be unable to take paper in, meaning it would sit and spin its internal rollers helplessly several times before complaining there was no paper loaded.
- The cause: a tiny spring, intended to load the paper intake rollers, is inadequately weak. The intake / feed-in rollers just slide around on top of the paper instead of gripping it and pulling it into the print mechanism.
- The solution: a bit of sponge (seriously).
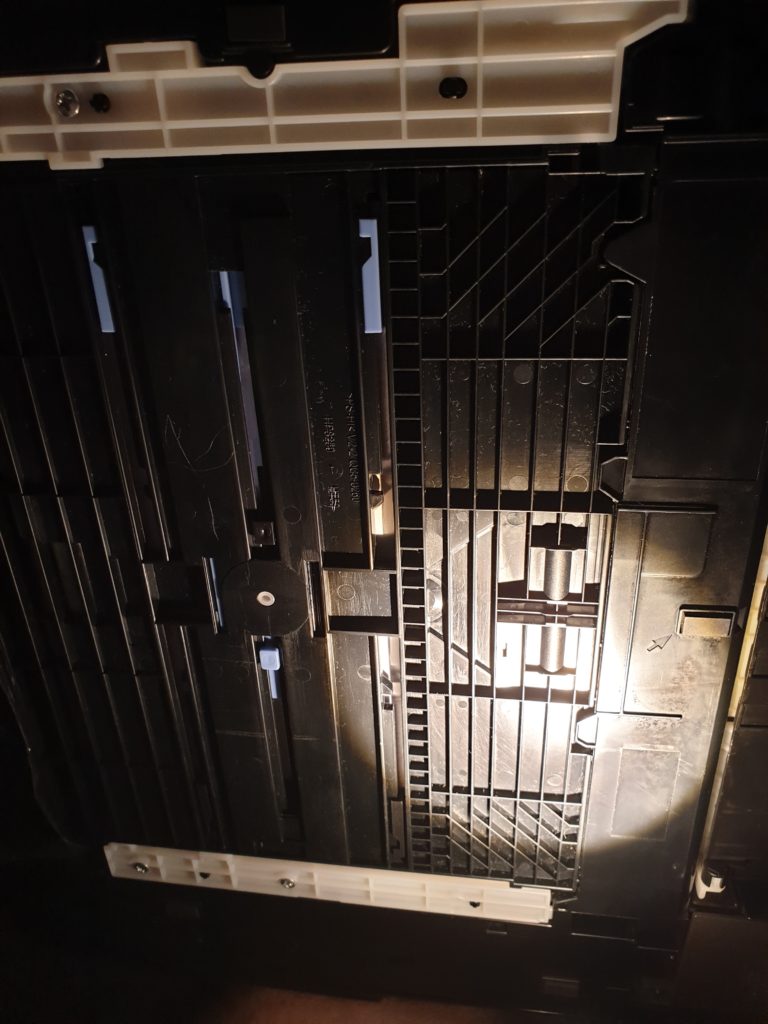
This is the underside of the printer. The paper tray forms the base of the printer when it's slid into place, the grey strips are its guide runners. (view larger)
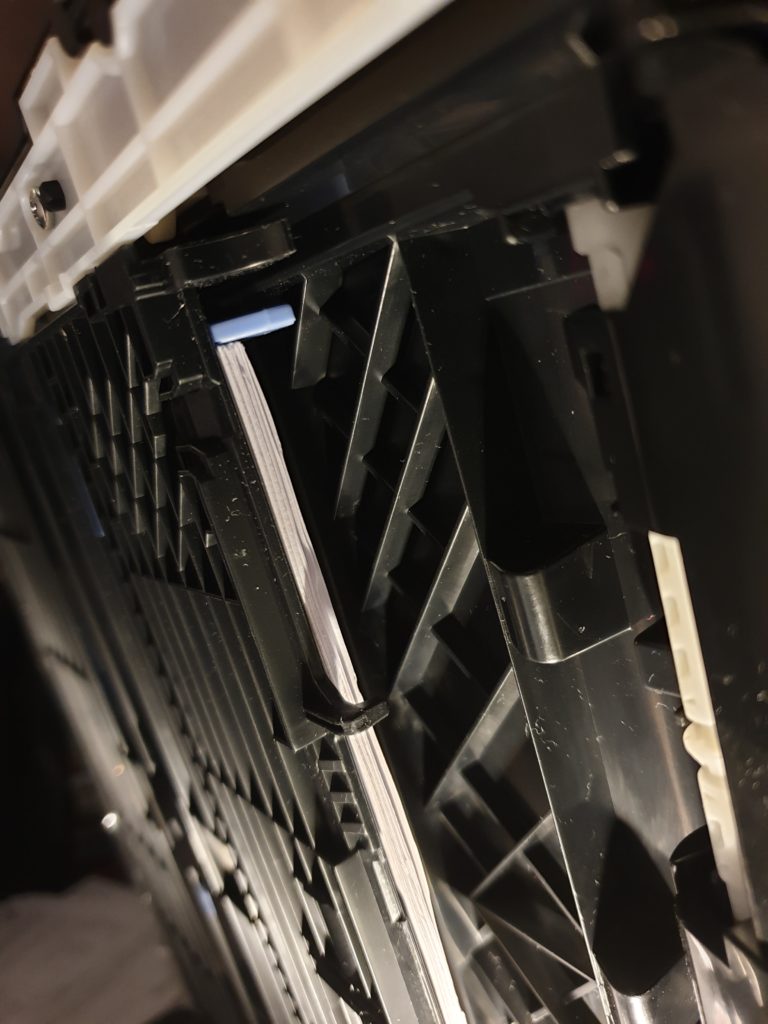
This is the underside of the printer on its side with the paper tray partway open.
What should happen: When you slide the paper tray closed, the black tab at the top of the image (just above the bit of blue plastic you can see against the paper) contacts a protruding black plastic 'leg', which pushes the infeed roller arm up and over the paper as it's inserted. (view larger)
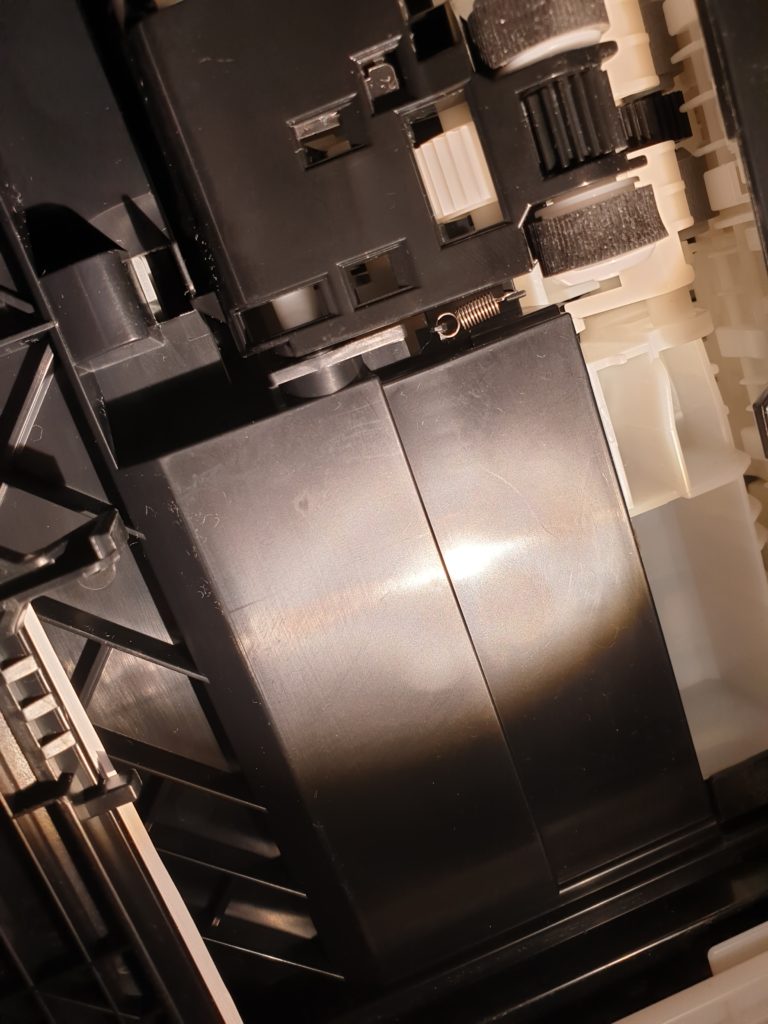
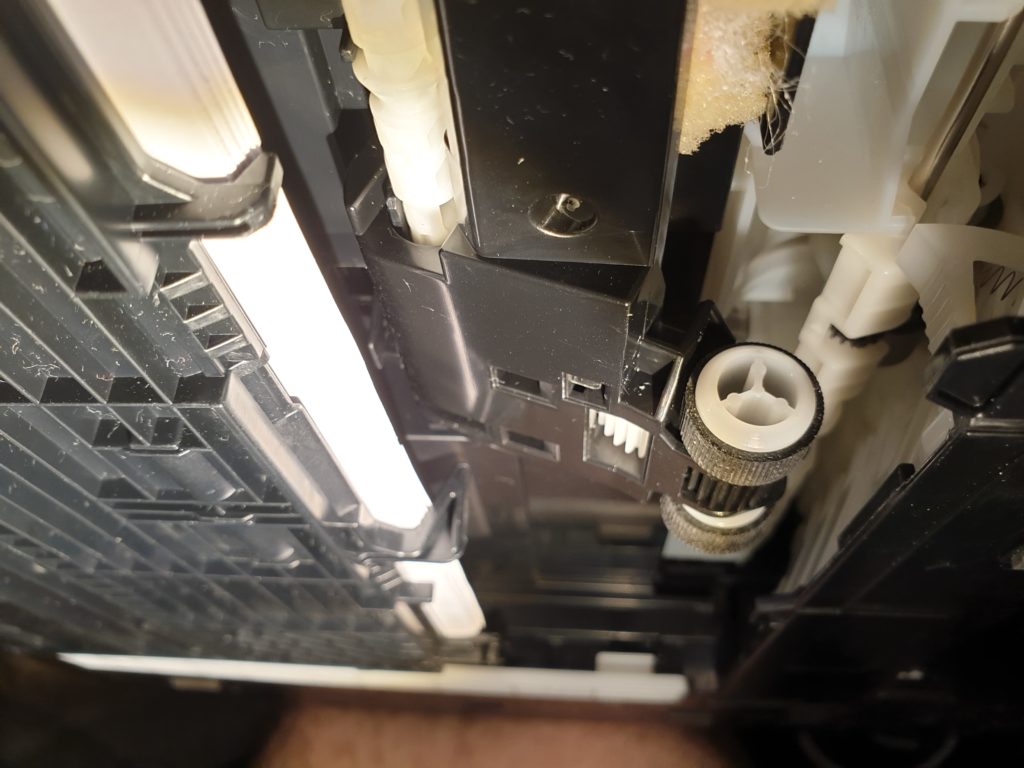
This would be fine, if the retaining spring's opposing force was strong enough. It's a miserably tiny thing. See it near the middle of the photo, just next to one of the two black rubber paper intake rollers? (view larger)
I tried all sorts - wrapping the rollers with small strips of tacky gaffer tape to widen their diameter; pushing up on the underside of the paper tray to try and make them contact the rollers better; I even moved the rubber tracks towards the edge of the wheels to make their edges 'ride up' and contact the paper better. Nothing worked well.
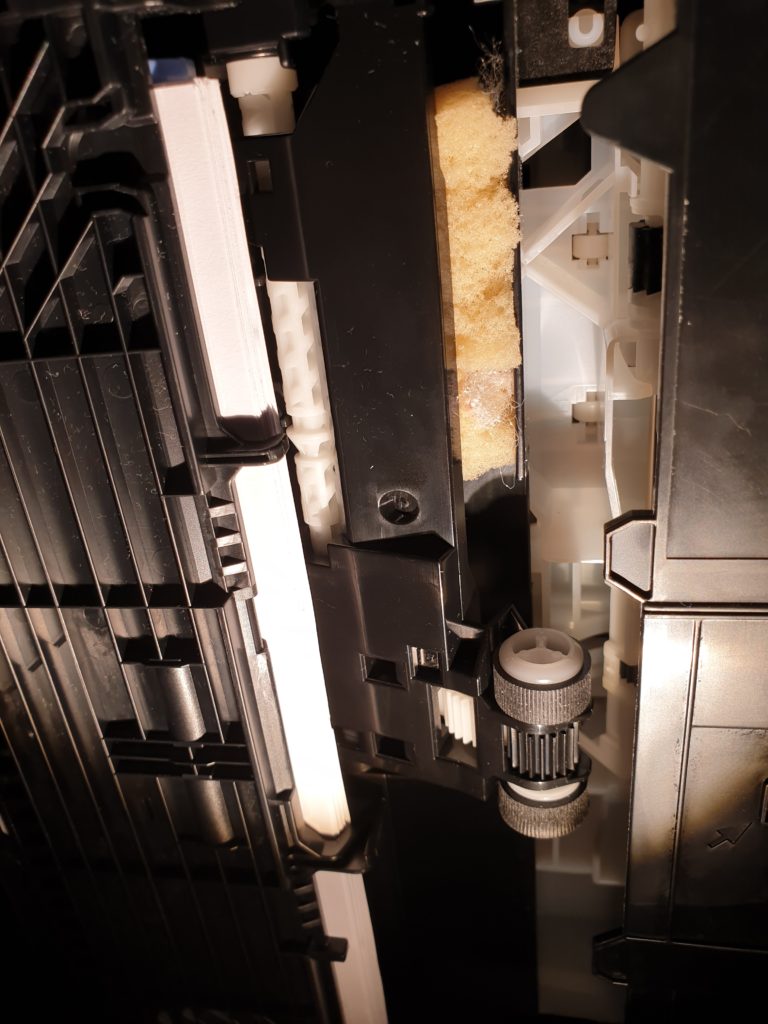
In the end, some sponge (visible behind the bar supporting the feed rollers) solved the problem! (view larger)
Before I used the sponge method, moving the grippy rubber bands to the edge of the grooves on the rollers worked, proving it was a simple issue of roller clearance, but it's not ideal. You end up stretching the rubber tracks around the feed rollers, wearing them smooth prematurely and ending up with catastrophic loss of grip, just like excessive camber on F1 cars (ha).
There's nothing really you can adjust with these printers; the tension spring was just not good enough to adequately pull the rollers down into contact with the paper. So I went to the Internet for inspiration because I knew I wanted to somehow either add weight to the horizontal bar on which the rollers were mounted, or increase the spring tension.
I wanted to avoid removing the tiny tension spring, because they frequently fly off into another dimension, and fortunately I stumbled upon a post by David Camm on a TechAdvisor forum thread:
Hi Folks, this is an asy fix, get a sponge, I used the sponge off a dish scourer, you only need half of that, cut it off the scourer part.
Now find the paper feeder roller that takes the paper from the tray. (its under the printer behind a panel that has the paper in. You will notice the feeder roller attached to a plastic panel that moves up and down to grip the paper, this roller has a small spring on the side. I noticed there is hardly any force pressing the roller to the paper, hence the problem.
Put the sponge behind the piece of plastic away from the rollers taking care not to put it behind the actual rollers. This increases pressure on the roller so it takes the paper every time. just done 150 double sided sheets with no problems. Make sure the plastic holding the roller still moves up and down freely, the sponge should not be so tight as it prevents free movement.My MG550 had this issue from new as well but this spong has fixed it. Its very simple to do.
DavidCamm on TechAdvisor
I realised that, as long as you fitted correctly-sized pieces of sponge snugly, and underneath the part of the bar closest to the tray slide rail (and without it catching in the rotating arm which drives the rollers), this is a beautifully neat solution which solves the problem.
An old Dishmatic head was just the right dimensions and with enough pushback thanks to its top layer to give the rollers adequate friction. Any medium density foam or sponge should work fine.
So thanks, David Camm, wherever you may be! You solved my frustrations and prevented me taking apart my printer in desperation to try and fix. Sometimes the stupidly simple solutions are the best!
I recently found that 'Beach Badger' tried the sponge fix with success - check his video on YouTube demonstrating how quick the fix is, or see below:
'Helen Spuddulike' also made a video demonstrating another method for cleaning some of the other internal rollers, involving some adhesive tape on a longer piece of cardboard. Her method has the advantage of allowing feed rollers to rotate and effectively self-clean while avoiding disassembly, which could be useful if you're getting dirty marks or ink stains on your paper:
'IONHowTo' also has a useful video compiling a few things to check and maintain on printers -- and what not to try (his demo printer is a Canon, but may be useful for owners of other brands):
These easy but non-obvious foxes do make me wonder how many people have thrown away an otherwise functional printer, just because the roller and tension spring design isn't fit for purpose. I'm really glad that so many people have had success and got their printers back in service, and I really appreciate people commenting and emailing me to let me know 🙂 On behalf of our planet, thank you for not throwing your printer in the trash!
Best thing about this fix is that it's trivial to reach the area once the paper 'cassette' is slid out, and it's easily reversible should you decide you don't want sponge there any more. Prop the printer on your knee on its side and just add the sponge pieces as needed. I went for two rectangular pieces. Secure the sponge with gaffer tape if you're feeling nervous, but it should be fine there forever.
Happy printing!
Simple and elegant solution. Hand feeding to print 30 copies of the same thing would have driven me insane!
Simple and elegant solution. Hand feeding to print 30 copies of the same thing would have driven me insane!
Thank you so much, this worked.
It was really bugging me.
Brilliant and simple fix - and I am not mechanically minded. Sometimes I've had to feed in each page. Many thanks for this! The half sponge fits in so neatly, perhaps it was always meant to be there.
Brilliant and simple fix - and I am not mechanically minded. Sometimes I've had to feed in each page. Many thanks for this! The half sponge fits in so neatly, perhaps it was always meant to be there
Brilliant and simple fix - and I am not mechanically minded. Sometimes I've had to feed in each page. Many thanks for this! The half sponge fits in so neatly, perhaps it was always meant to be there.
Hello fellow conspiracy theorist 🙂
Seems to have fixed my MG6450 just when I was thinking it was time to get a new one. Thanks for the tip. Much appreciated.
Absolutely brilliant! Worked first time. Took a bit of detective work to sort out the pictures but once I could see what he was talking about I fixed it in 5 minutes with a kitchen sponge and a pair of scissors.
Well done and many thanks. Now I don't have to sit next to the printer pushing every page in .
c
Brilliant, Canon should be paying you for this.
They can pay me in professional cameras, absolutely!
Brilliant fix - thanks!
I have a PIXMA MG2522 and with the year warranty, I just went ahead and contacted customer support and arranged to have a replacement printer sent to me, after which I use their packaging to return the one I have. But that's going to take 2 days to process and another 5 at least to ship and that is if the holidays don't make it even later with the increase in packages being sent by everyone right now. Thing is, it quit on me just as I was printing out a bunch of Tenya Lida stickers and was about to print some iron-on patches that my daughter wants for Xmas. No time to wait, no money to waste on a second printer. And then I found your post. Mine is a different PIXMA, but the same cheap plastics/rubbers, same tiny (though longer)ineffectual spring. After looking over your pictures carefully and reasoning out and recognizing the slightly different arrangement of mine from underneath, I took an old flat sponge, folded it in half, and put it where it seemed like it should go in comparison to your shot and Booyah! It immediately started feeding the paper in and printing again. You are awesome, Christopher! I'm happy that I'll be getting a new printer and returning this one, simply because of the free ink that will come with it, lol. but now I can use up the rest of this ink and get my daughter's My Hero Academia stuff done before Christmas without a bunch of hassle or cost. Thank you, Thank you.
Works like a charm now. Thank you!
I also owe you my thanks as was just about to buy another printer in frustration. Bit worried initially as my first try didnt work as I was too delicate in stuffing too small a piece of sponge. Increasing the size of the stuffing worked a dream! Many thanks. PS Only problem now is that I will now have to look elsewhere for my daily exercise - no more regular trips to the printer to feed the paper through!!!
I also owe you my thanks as was just about to buy another printer in frustration. Bit worried initially as my first try didnt work as I was too delicate in stuffing too small a piece of sponge. Increasing the size of the stuffing worked a dream! Many thanks. PS Only problem now is that I will now have to look elsewhere for my daily exercise - no more regular trips to the printer to feed the paper through!!!
This works! Great tip for simple fix Had to guess size of piece of synthetic sponge. Tried smaller less than an inch cube of sponge, too small and didn’t help. Took it out and tried size 1 1/4inch x 1 3/4inch rectangle, approximately. It works!
I didn’t take the printer apart so had to wedge my, (luckily skinny long), fingertips way back inside the paper tray area to reach the area above and beside the roller-wheel arm and the sponge stuck out a little, but it worked great! I’m so happy you showed us with pictures that helped perfectly. You saved me hundreds. Thank you so much for your post.
Can you tell me how deep the piece of sponge needs to be? I’ve tried a few times and still not fixing it. My piece is about 5mm
I had just finished watching a video on the dismantling of my printer when I saw your fix and so much simpler, than a workshop littered with printer parts and the prospect of way too many left when reassembled. 🙂 thanks!
Brilliant who would have thought a pit of sponge foam would solve this, Nearly through my printer out the window today .
Thank you for this tip
Getting deeply frustrated in lockdown with a v cheapo canon MG3050, that takes paper an inch in, then prints merrily on the roller. I've found your helpful sponge idea but can't seem to find any route into this solid block of printer to apply sponge gripper. A-level student tearing her hair out over this. Any help much, much appreciated!
I have spent far too long working out the best way to push paper into the printer. What a fabulous fix. Many thanks
I have a similar paper feed problem with my Pixma MG3150, and I can see the little feed rollers at the back of the feed tray. But unlike yours, I can't find any way to remove the feed tray to fit the magic sponge, as it seems to be part of the casing. Any ideas please?
Sorry it took me so long to see your reply! An overly aggressive anti-spam plugin on my site hid a load of legitimate comments.
I'm not sure either - but this iFixit teardown may be able to assist? https://www.ifixit.com/Guide/Canon+Pixma+MG3550+Disassembly/119426
Let me know how you get on!
Thanks very much for this Chris. Excellent instructions for removing scanner from printer, but unfortunately no easier to access offending rollers. Removing the entire printing chassis was more than I could do without instructions, but it seems to be the only way to separate it from the base, which has no obvious fasteners or clips.
A different solution I found in my searches was to partially feed in some abrasive paper to 'scrub' the rollers, which work for the author. I have also seen cleaning papers for sale but not sure what components they clean and are they appropriate for my printer?
All the best,
Malcolm
This actually worked! Thanks man!!
As far as I can tell this worked a treat and took less than a minute to do. Thanks a lot for putting an end to something that had been annoying me for too long!
Well done, been pushing individual pieces of paper through for months,
Canon should market their printers with an additional piece foam in the box just in case!
Sorted
An amazing fix with the sponge rubber, easy to do, instant success, you are a genius and deserve to be sainted.
I'll take covid immunity if the sainthood isn't available...
hey thanks very much ! looks like it's working fine now. been wrestling with the beast for over a year trying to get it to work !!
If this doesn't work first time, check that the roller mechanism itself is running freely.
The two white cogs in the assembly were not running freely in my my 6650.
I only realised after I bought a broken 5650 for spares intending to replace the roller and it became clear the mechanism in the spares 5650 was running much more smoothly than in my 6650. I applied a bit of WD40 to my 6650s rollers and cleared the grooves in the cog of any debris. In conjunction with the sponge trick it worked.
The sponge trick didn't work for me first time, so I don't know whether the WD40 applied to the roller cogs/cleaning was the answer or whether it was a combination of the two.
Brilliant! Just a bit of sponge and the printer is saved from a trip to the tip!
OMG.. I was going mad and was just about to throw my 5750 out!! So glad Google found your solution. Many many thanks.
And thank you for not binning an otherwise functional printer 🙂 Every little helps to prevent premature heat death of the planet.
Thank you for the great idea. But I just don't understand how you get to that roller. My GM5330 underside is closed and seems that I need to use violence to get it open.
You have the Pixma MG5330? Not sure as I've never owned one myself, but perhaps one of these videos might give you some clues? You may have to come at the mechanism from side panel access...
https://www.youtube.com/watch?v=tN2rDbE2QJg
https://www.youtube.com/watch?v=TozhzQo15lk
Only thing I don't get is how to open the underside panel to get to the roller (without using extreme violence)
Ah, so you don't actually need to open the underside - you can reach it just through the gap. I was able to wiggle it in with my fingers, no trouble.
Though if you own a printer model with a covered underside panel, you may have to remove a side panel. What's your model?
Thanks....it worked!!
What a great tip, i have been putting up with the paper fed problem for ages. I even exchanged one printer under warranty for the fault. 10 minutes reading and a little more cutting a pieceof sponge and all seems to working. Thank you
Thanks for the tip, this works great. Saved me having to bin the otherwise working out of warranty printer.
Wow! That actually worked! You, sir, are brilliant! Thank you so much for sharing!
Cheers for the comment and glad you have a nice functional printer now! 🙂
Our Canon MG 5750 printer had got to 4 years old before it started to have paper feed problems so perhaps we were lucky! Your brilliant tip with easy to follow instructions has solved the problem. Thank you so much.
You, Sir and David Camm, are geniuses. It works a treat!
Many thanks,
John
Amazing! This has been driving me nuts! Thanks so much for sharing this.
Absolutely brilliant solution.
2 minutes work with a bit of kitchen foam sponge. Saved thinking of scrapping a perfectly good printer.
Cannon should be ashamed of themselves. This is obviously a general fault in manufacture.
Thank you!! Worked perfectly for me on a Canon MX454. Such a nifty trick!!
Very glad to hear this continues to be a great solution 😀 And disappointing that Canon's penny-pinching has led to such an endemic design flaw. Did you have any difficulty accessing the bottom of your unit? Another commenter said the MX432 has a closed underside. It seems you can access by flipping the printer on its side, but just wondering if you had to do any major surgery to access, or if it was tool-free access?
Thank you very much to both of you - this has been driving me crazy for months and my intermittent erratic printer always sensed when I was in a hurry and just teased me until we fell out big time! I won't have to swear at my lovely printer anymore!
Worked beautifully - thanks a million for such a simple and elegant solution. JWCS
Thanks for this fix, it worked really well on the first try. I used a scotchbrite sponge which has springy consistency. I cut a piece about 20mm x 20mm x 40mm long.
I have a MX432 Canon printer. The underside is covered and I am unaware of how to open it up. Any suggestion for how to install the sponge on this model to fix the paper grabber issue.
Hi Dorothy, perhaps this Canon FAQ article will help? https://support.usa.canon.com/kb/index?page=content&id=ART137527
So simple. Grateful to benefit from your ingenuity! THANK YOU!
A really elegant solution! I had been reduced to hand feeding on my 5750. Instant success! The suggested 1 1/4 x 1 3/4 worked perfectly. Make sure the sponge is the type that comes off the back of a scrubber rather than the separate sponges that have big holes.
I had to adapt the method for my MG3150, because the bottom panel is fixed (there is not a removable paper tray. Slightly more fiddly, needed to work in the narrow paper path, and used a smaller piece of sponge because of the layout of the arm on which the rollers are mounted. But it works - from feeding 95% of pages individually I now have 2 feed fails in 60 pages. Thanks so much!
Great to hear it worked and also thanks for the useful feedback on your printer model. Did you manage to get fingers/hand in the gap or did you have to use something to push it down?
Thank you for sharing your solution, worked for my mx6600 model.
I love you!!
nawww thanks <3